TODO
#### Home Assistant In Home Assistant wird in der Konfiguration ein input\_select Dropdownmenü angelegt. [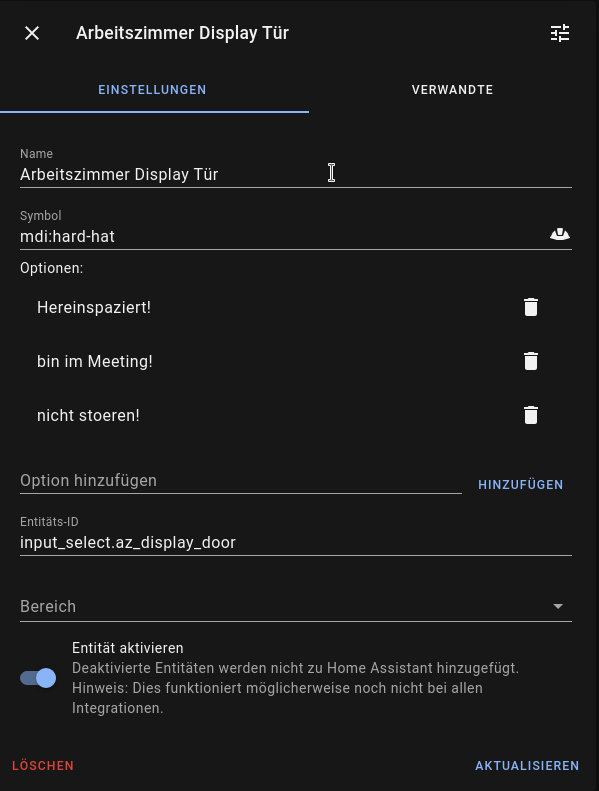](https://wiki.magenbrot.net/uploads/images/gallery/2021-06/screenshot-20210610-205043.png) Dann hab ich noch 3 Automatisierungen mit denen ich die Ampel und den Displaytext einfach steuern kann. Grüne Ampel: ```YAML alias: AZ - Display Hereinspaziert! description: '' trigger: - platform: state entity_id: switch.az_display_led_gruen to: 'on' from: 'off' condition: [] action: - service: input_select.select_option target: entity_id: input_select.az_display_door data: option: Hereinspaziert! mode: single ``` Gelbe Ampel: ```YAML alias: AZ - Display nicht stoeren! description: '' trigger: - platform: state entity_id: switch.az_display_led_gelb to: 'on' from: 'off' condition: [] action: - service: input_select.select_option target: entity_id: input_select.az_display_door data: option: nicht stoeren! mode: single ``` Rote Ampel: ```YAML alias: AZ - Display Meeting description: '' trigger: - platform: state entity_id: switch.az_display_led_rot to: 'on' from: 'off' condition: [] action: - service: input_select.select_option target: entity_id: input_select.az_display_door data: option: bin im Meeting! mode: single ``` #### ESPHome Code ```YAML esphome: name: arbeitszimmer_display_door platform: ESP8266 board: nodemcuv2 wifi: ssid: !secret iot_wifi_ssid password: !secret iot_wifi_password power_save_mode: none manual_ip: static_ip: 172.16.72.103 gateway: 172.16.72.1 subnet: 255.255.255.0 dns1: 172.16.71.1 ap: ssid: "Arbeitszimmer Display Door" password: !secret fallback_password captive_portal: logger: api: ota: web_server: port: 80 i2c: sda: D2 scl: D1 switch: - platform: gpio pin: D5 interlock: &interlock_group [az_display_led_rot, az_display_led_gelb, az_display_led_gruen] id: az_display_led_rot name: "LED rot" - platform: gpio pin: D6 interlock: *interlock_group id: az_display_led_gelb name: "LED gelb" - platform: gpio pin: D7 interlock: *interlock_group id: az_display_led_gruen name: "LED grün" display: - platform: lcd_pcf8574 id: my_display dimensions: 16x2 address: 0x27 lambda: |- it.printf(0, 0, "%s", id(my_text).state.c_str()); it.strftime(0, 1, "%H:%M %d.%m.%Y", id(my_time).now()); text_sensor: - platform: homeassistant id: my_text name: "Text" entity_id: input_select.az_display_door time: - platform: homeassistant id: my_time ``` Nachdem der Code auf den ESP geladen wurde, sollte diese Node im Home Assistant als neue Integration auftauchen. Wenn alles passt, lassen sich nun LEDs und Display über die zur Integration gehörenden Entities steuern.Ich habe etwas gebraucht, um die i2c-Adresse des Displays herauszufinden. Nach ungefähr einer Stunde habe ich dann festgestellt, dass ESPHome nach dem Boot den ic2-Bus scannt und man dort die Adresse direkt im Log sehen kann.
Alternativ zu dem input\_select würde auch ein input\_text funktionieren. Damit kann man auch freien Text eingeben. In Lovelace sieht das mit der entity-card so aus: [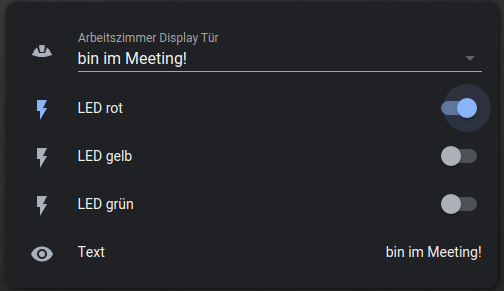](https://wiki.magenbrot.net/uploads/images/gallery/2021-06/screenshot-20210610-205539.png) # Luftdaten / Airrohr in ESPHome Hier ist die Funktion des Projekts von [luftdaten.info](https://luftdaten.info/) bzw. [sensor.community](https://sensor.community/) in ESPHome umgesetzt. Es fehlt hier natürlich die Anbindung an die offiziellen externen APIs oder Schnittstellen außerhalb von Home Assistant (z.B: InfluxDB). ```YAML esphome: name: luftdaten1 platform: ESP8266 board: nodemcuv2 wifi: ssid: !secret iot_wifi_ssid password: !secret iot_wifi_password manual_ip: static_ip: 172.16.72.102 gateway: 172.16.72.1 subnet: 255.255.255.0 dns1: 172.16.71.1 ap: ssid: "Luftdaten Fallback Hotspot" password: !secret fallback_password captive_portal: # Enable logging, but use UART1 as UART0 is used by the sds011 sensor logger: hardware_uart: UART1 api: ota: # serial communication SDS011 particle matter concentration sensor uart: rx_pin: D1 tx_pin: D2 baud_rate: 9600 sensor: # SDS011 particle matter concentration sensor - platform: sds011 pm_2_5: name: "Luftdaten Feinstaubkonzentration <2.5µm" pm_10_0: name: "Luftdaten Feinstaubkonzentration <10.0µm" update_interval: 5min # DHTP22 - platform: dht pin: D7 temperature: name: "Luftdaten Temperatur" humidity: name: "Luftdaten Luftfeuchtigkeit" update_interval: 60s - platform: wifi_signal name: "Luftdaten WiFi Signal" id: luftdaten_wifi_signal update_interval: 60s - platform: template name: "Luftdaten WiFi Quality" update_interval: 60s unit_of_measurement: "%" icon: "mdi:wifi" lambda: |- if (id(luftdaten_wifi_signal).state <= -100) { return 0; } else if (id(luftdaten_wifi_signal).state >= -50) { return 100; } else { return 2 * (id(luftdaten_wifi_signal).state + 100); } ``` # Kapazitives HygrometerTODO
```YAML esphome: name: bodenfeuchtigkeit1 platform: ESP8266 board: nodemcuv2 wifi: ssid: !secret iot_wifi_ssid password: !secret iot_wifi_password manual_ip: static_ip: 172.16.72.101 gateway: 172.16.72.1 subnet: 255.255.255.0 dns1: 172.16.71.1 ap: ssid: "bodenfeuchtigkeit_fallback" password: !secret fallback_password captive_portal: logger: api: ota: sensor: - platform: adc pin: A0 unit_of_measurement: "%" filters: - median: window_size: 7 send_every: 4 send_first_at: 1 - calibrate_linear: - 0.79 -> 0.00 - 0.34 -> 100.00 - lambda: if (x < 1) return 0; else return (x); accuracy_decimals: 0 name: "bodenfeuchtigkeit1" update_interval: 2s ```